Native components in React Native
A step-by-step guide on how to create a Fabric component for your app
I recently had the chance to create a new library using React Native’s new renderer, Fabric, and I thought of documenting this personal milestone. My hope is for this post to be useful to anyone wanting to create their own native component.
Keep in mind, this is not your usual post you read diagonally to get an idea of how native components work, rather, it’s a step by step guide with lots of code snippets, diffs, and sidenotes for the ones who truly want to create a native component of their own.
The library
For the sake of this post, we will create a new native library to edit images. The component we will create here is nothing but a simplified version of our own image edition library: Sorolla. Feel free to visit the project to watch a more complete implementation of the things we will read here.
The library will provide two silly features:
- Hand-draw on top of an image.
- Tint an image with a random color.
We picked these because they will help us go through the three basic mechanisms to interact with our Fabric components: props, callbacks and commands.
On Fabric and the new architecture
In case you missed it, in October 2024 the React Native team anounced that their big redesign of React Native had come to an end. They called it the New Architecture™️, and it came with some niceties to the framework:
- Bye bye asynchronous bridge: Communication between the native layer and the JS layer is now done through JSI rather than using an asynchronous, JSON-serialized, event-driven queue. Removing serialization, and turning the communication synchronous has a noticeable impact on performance.
- Synchronous layout: The new architecture makes it possible to run layout effects synchronously with
useLayoutEffect. That removes the hacks required to prevent the unpopular split-second layout-related flickering. - Concurrent rendering: Let’s welcome
Suspense(finally!) and other React 18 features like transitions or auto-batching.
As part of this new architecture, the React Native team created a new renderer: Fabric. This is what we will use to create our new native component.
Kickoff
We are going to use create-react-native-library to create a new Fabric component. Just to give you some context, the library is part of Callstack’s react-native-builder-bob, a fantastic set of tools to create and maintain RN libraries.
Without further ado, let’s create our library by running create-react-native-library.
npx create-react-native-library@latest react-native-silly-image-editorBecause we are using the latest version, keep in mind some things in this guide might change
You will see many options to configure the library as you want. The most important option for this guide is the one to decide which kind of library we want: a Fabric view.
✔ What is the name of the npm package? … react-native-silly-image-editor
✔ What is the description for the package? … React Native library to do image editions like hand-drawing or color tinting
✔ What is the name of package author? … Antropia
✔ What is the email address for the package author? … hi@antropia.studio
✔ What is the URL for the package author? … https://antropia.studio
✔ What is the URL for the repository? … https://github.com/antropia-studio/react-native-silly-image-editor
? What type of library do you want to develop? › - Use arrow-keys. Return to submit.
    Turbo module
    Nitro module
❯   Fabric view - integration for native views to JS # 👈 SELECT THIS OPTION
    Legacy Native module
    Legacy Native view
    JavaScript library
✔ Project created successfully at react-native-silly-image-editor!
Take your time filling in all the settings for your library
By default, created-react-native-library uses yarn but this can be changed by your preferred package manager. I personally use pnpm nowadays, at least until npm catches up with some of the great things pnpm does. Just remember to find all yarn calls around the generated code and replacing them by your thing. In this guide we will do the switch to pnpm, first replace yarn by pnpm in all the obvious places like Github actions and the package.json scripts. Finally, add the following two files to your repository to save you some headaches:
hoist=false
shamefully-hoist=truepackages:
- 'example'For some reason, react native does not like symlinks in node_modules. I know (or should I say “sense”) this configuration is far from ideal, but it has been the quickest way to get the project working with pnpm.
If you followed these steps, you will be able now to run the example app with pnpm run --filter react-native-silly-image-editor-example [start/android/ios].

The popular green square running in an iOS simulator
Project structure
To start changing things in our new library, we first need to understand where are things located.
react-native-silly-image-editor
├── android                                    📘 Native Android code (Gradle + Kotlin)
├── example                                    📘 Example app to test your library (regular RN project)
├── ios                                        📘 Native iOS code (XCode + Objective-C)
├── src                                        📘 JS/TS code for your library
│   ├── index.tsx                              📘 Your project exports
│   └── SillyImageEditorViewNativeComponent.ts 📘 Codegen specification for your component
└ SillyImageEditor.podspec                     📘 Pod specification for iOS consumers of your library
This rather incomplete tree will help you understand the tools you will be using in each part of the library
All our TS code lives in the src directory. The most important file here is the codegen spec file. This file declares the API with the native side and will be used by codegen to create interfaces in Kotlin and Objective-C to communicate between layers. This code will be created in the android and ios directories, where all our native code will be.
Finally, the example folder contains the example app which we will use, not only for testing purposes, but also to fire up our editors to tweak the native code of our library. I promise we’ll get there soon but, for now, just remember that to edit your Kotlin or Objective-C/Swift code, you will be opening the example app with your editor, rather than the android and ios directories.
Adding a URI prop
Let’s jump into the first communication mechanism we have to build our native libraries: component props. It is the simplest, and most natural way to pass information to our native components. To do this, we will specify a uri prop to load an image in the native side.
The default project is already using this mechanism to send a color prop (remember the green square?) so sending a URI instead is as easy as replacing that prop in our spec file:
 import type { ViewProps } from 'react-native';

 interface NativeProps extends ViewProps {
-  color?: string;
+  uri?: string;
 }

 export default codegenNativeComponent<NativeProps>('SillyImageEditorView');
There is no real need to declare uri optional but it will make things a bit easier on the example app.
Remember, every time we change the spec file we need to run codegen that will automatically generate for us the interfacing layer to communicate with Kotlin and Objective-C. Let’s run it with pnpm run prepare. Strictly speaking, we are calling react-native-builder-bob, that is using codegen internally. If you want to run codegen and codegen only (which is very useful when faced with codegen errors), add a new script to your project:
   "scripts": {
     "clean": "del-cli android/build example/android/build example/android/app/build example/ios/build lib",
+    "codegen": "react-native codegen",
     "example": "pnpm --filter react-native-silly-image-editor-example run start",
     "lint": "pnpm run lint:types && pnpm run lint:eslint",
     "lint:types": "tsc --noEmit",
Finally, let’s change the example app so that we load an image from the media library. We first add react-native-image-picker as a dependency of the example app.
pnpm install --filter react-native-silly-image-editor-example react-native-image-pickerAnd let’s implement a basic image picker in the app:
import {
  Dimensions,
  StyleSheet,
  Text,
  TouchableOpacity,
  View,
} from 'react-native';
import { SillyImageEditorView } from 'react-native-silly-image-editor';
import { useCallback, useState } from 'react';
import { launchImageLibrary } from 'react-native-image-picker';

export default function App() {
  const [imageUri, setImageUri] = useState<string | undefined>();

  const pickImage = useCallback(async () => {
    const response = await launchImageLibrary({
      mediaType: 'photo',
      selectionLimit: 1,
    });

    const assets = response.assets ?? [];
    if (assets.length === 0) return;

    setImageUri(assets[0]!.uri);
  }, []);

  return (
    <View style={styles.container}>
      <SillyImageEditorView uri={imageUri} style={styles.box} />
      <TouchableOpacity onPress={pickImage} style={styles.button}>
        <Text style={styles.text}>Pick image</Text>
      </TouchableOpacity>
    </View>
  );
}

const styles = StyleSheet.create({
  container: {
    flex: 1,
    alignItems: 'center',
    justifyContent: 'center',
    backgroundColor: '#0d0d0d',
  },
  box: {
    width: Dimensions.get('window').width,
    height: '70%',
  },
  button: {
    paddingHorizontal: 20,
    paddingVertical: 10,
    backgroundColor: '#0030FF',
    borderRadius: 5,
  },
  text: {
    fontSize: 20,
    color: '#fff',
  },
});
Android
It’s time to load the URI in our native Android code. I recommend using Android Studio for this section, but use the editor that better suits your needs. Now, as I told you before, we will be opening the example/android app rather than loading the android library directly. This is because we will be building the app all the time to test our changes in an emulator.
Now if you followed me here with the pnpm switch, you will need to do some changes to the Android project before continuing:
     "@react-native-community/cli-platform-android": "15.0.1",
     "@react-native-community/cli-platform-ios": "15.0.1",
     "@react-native/babel-preset": "0.78.0",
+    "@react-native/codegen": "^0.78.0",
+    "@react-native/gradle-plugin": "^0.78.0",
     "@react-native/metro-config": "0.78.0",
     "@react-native/typescript-config": "0.78.0",
"react-native-builder-bob": "^0.37.0"-pluginManagement { includeBuild("../node_modules/@react-native/gradle-plugin") }
+pluginManagement { includeBuild(file("../node_modules/@react-native/gradle-plugin").toPath().toRealPath().toAbsolutePath().toString()) }
plugins { id("com.facebook.react.settings") }
extensions.configure(com.facebook.react.ReactSettingsExtension){ ex -> ex.autolinkLibrariesFromCommand() }
rootProject.name = 'sillyimageeditor.example'
include ':app'
-includeBuild('../node_modules/@react-native/gradle-plugin')
+includeBuild(file("../node_modules/@react-native/gradle-plugin").toPath().toRealPath().toAbsolutePath().toString())With that, I recommend running the first build in the command line by running:
pnpm run --filter react-native-silly-image-editor-example start # 👈 in a different terminal to keep it running
pnpm run --filter react-native-silly-image-editor-example android
From now on, all builds can be made within Android Studio itself and if, at any point, that doesn’t work, you can always resort to CLI commands whenever you need.
Let’s prepare our native code to load an ImageView and properly set the uri that comes from the props. The native projects consist of two main components: the view manager, that handles all the back and forth communication with our TS code, and the view itself, the thing we are rendering on the screen.
     return SillyImageEditorView(context)
   }

-  @ReactProp(name = "color")
-  override fun setColor(view: SillyImageEditorView?, color: String?) {
-    view?.setBackgroundColor(Color.parseColor(color))
+  @ReactProp(name = "uri")
+  override fun setUri(view: SillyImageEditorView?, uri: String?) {
+    uri ?: return
+
+    view?.setImage(uri)
   }

companion object {package com.sillyimageeditor
import android.content.Context
import android.net.Uri
import android.util.AttributeSet
import android.view.LayoutInflater
import android.view.View
import android.widget.ImageView
import android.widget.RelativeLayout
import androidx.core.net.toUri
class SillyImageEditorView : RelativeLayout {
private val imageView: ImageView
constructor(context: Context?) : super(context)
constructor(context: Context?, attrs: AttributeSet?) : super(context, attrs)
constructor(context: Context?, attrs: AttributeSet?, defStyleAttr: Int) : super(
context,
attrs,
defStyleAttr
)
init {
LayoutInflater.from(context).inflate(R.layout.image_editor, this, true)
imageView = findViewById(R.id.image_view)
}
fun setImage(uri: String) {
imageView.setImageURI(uri.toUri())
}
}<?xml version="1.0" encoding="utf-8"?>
<RelativeLayout xmlns:android="http://schemas.android.com/apk/res/android"
xmlns:tools="http://schemas.android.com/tools"
android:layout_width="match_parent"
android:layout_height="match_parent"
android:orientation="vertical">
<ImageView
android:id="@+id/image_view"
android:layout_width="match_parent"
android:layout_height="match_parent"
android:layout_centerInParent="true"
android:padding="16dp"
android:scaleType="fitCenter"
tools:srcCompat="@tools:sample/backgrounds/scenic" />
</RelativeLayout>We are using here the classic (now probably old) layout resources to paint things on the screen. We are picking this over Compose, if only to keep the component small (Compose comes as a library that adds to the final bundle size).
If we build our Android app now we will see our first integration working! Any change to the uri prop is properly communicated to the native code.
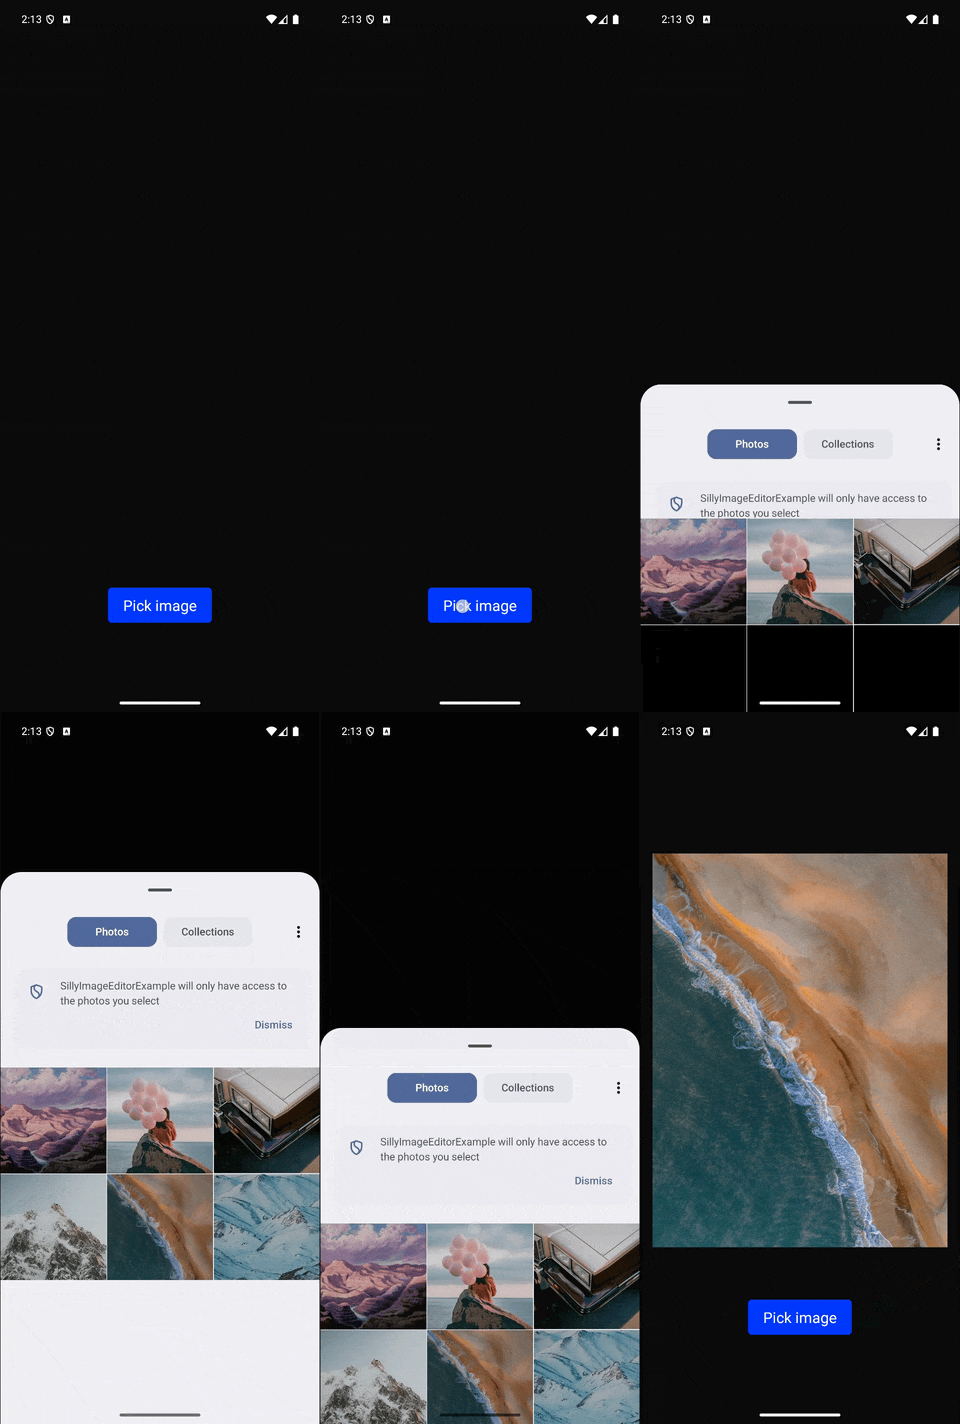
The image picker running on an Android emulator
iOS
iOS is always a challenge for me, specially because I dread my days coding Objective-C and that’s unfortunately the default for native iOS components. Do not fear though, it’s possible to keep Objective-C to the bare minimum while moving our views and logic to Swift thanks to compatibility headers.
First things first, open your iOS example with XCode.
xed example/iosYou will be able to edit your native code from the example app by opening the Pods project and looking for the SillyImageEditor library in the Development Pods.
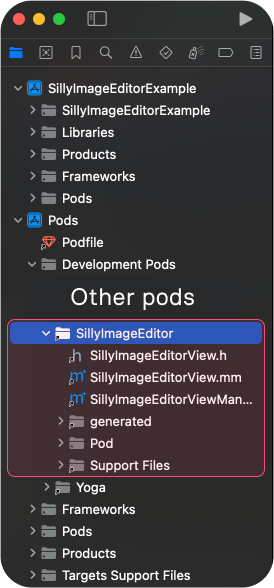
You don’t want to modify the example app iOS code but the library
You will see there are two files, just like in Android, a view manager and the view itself. Both are in Objective-C, and I’m afraid there is little we can do about it. What we can do is to use the Objective-C view class as a shallow indirection to wrap our Swift component, so let’s do that.
Let’s start by creating a new Swift class, I called mine SwSillyImageEditorView.swift. This class will contain all the logic to load the image from the uri prop, and the other features we plan to implement. Make sure to add this class to the ios directory of your project (not the example/ios one). XCode will ask you to create a bridging header, you don’t need it (it is used to call Objective-C code from Swift, we are doing the exact opposite). We are also going to load SnapKit to build our layout. The reason I’m using SnapKit (which is just a DSL over the classic layout functions in UIKit) rather than SwiftUI is the lack of support for the latter.
💡 I found this article where the author describes the steps to make SwiftUI work but I couldn’t make it work myself so I left it out of this guide.
Notes:
- Add a better way to display diffs and load images with react-native-image-picker
Steps:
- Explain the new architecture and what is Fabric (new renderer).
- react-native-builder-bob and create-react-native-library: Explain the two packages and how to run create-react-native-library to create your library (Select Fabric, etc). Explain the project structure (package, example app, etc)
- Sending the URI to the component and loading the image.
- Coding in Kotlin
- Coding in Swift (tweaking the project to work in Swift - https://medium.com/@someSOAP/react-native-fabric-component-using-swiftui-40d692c1baaa)
- Adding a callback
- Sending an event (because not always a state prop is the way to go, for example, responding to a button event in pure react native to change the color of the image randomly).